ARM TrustZone, its Applications, and the MCU Xpresso55S69
Overview:
The creation of ARM TrustZone stems from a simple question: how can high-value code and data be protected (primarily in IoT devices and systems) without significantly slowing development?
The core idea put forth by the developers of ARM TrustZone is that the objective above can be accomplished by isolating critical firmware and private information. TrustZone’s isolation is hardware-enforced, with a “Secure” and a “Non-Secure”/”Normal” world (shown as “Trusted view” and “None-trusted view” in Figure 1 below). Present on ARM’s Cortex-M and Cortex-A processors, TrustZone is a “SoC (System-on-Chip) and CPU system-wide security solution”, per Pinto and Santos [4]. By restricting access to “secure” (“trusted”) memory and I/O, ARM TrustZone reduces the attack surface of critical components.
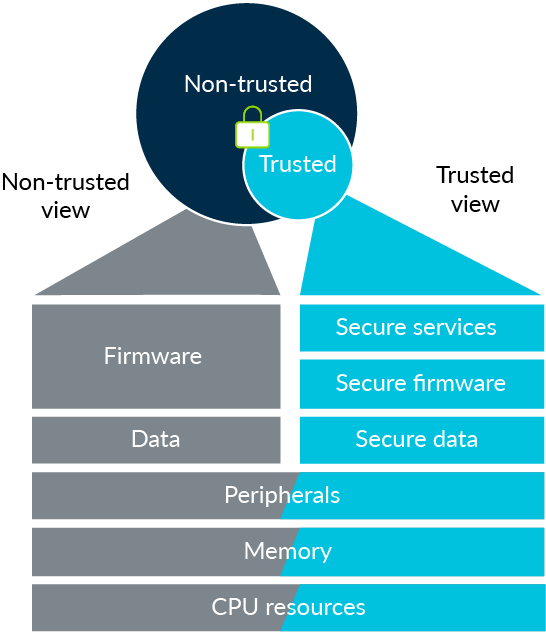
Figure 1: An Overview of TrustZone
Being implemented at the hardware level gives TrustZone some advantages, but what are the risks involved? Can TrustZone be exploited?
How it Works:
When looking at the inner workings of ARM TrustZone, it is perhaps best to look from the perspective of an individual device. For the purposes of this post, we will hone in on the NXP LPCXpresso 55S69 board, which possesses a Cortex-M processor with TrustZone.
First, looking at the memory layout of the Cortex-M, it can be observed that the memory is divided into “Secure” and “Non-Secure” regions, the layouts of which are shown in Figure 2. One of the key pieces here is known as the Security Attribution Unit, or SAU, which serves functions such as configuring non secure memory, peripheral, and interrupt access (for more about the SAU, see [7] and [8]).

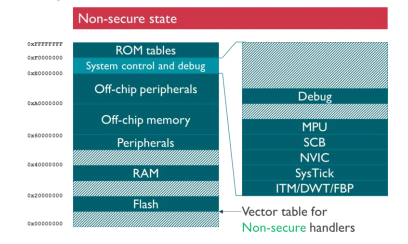
Figure 2: Memory Layout for Secure and Non-secure states
Another significant feature of TrustZone on the Cortex-M is the Secure Gateway opcode, which allows Secure Code to define a strict set of entry points from the Non-Secure code. This parlays into switching worlds in code, from Secure to Non-Secure and vice versa. From the images in Figure 3, the specific low-level calls used to switch between worlds are shown (Figure 3a) and the higher level concept is illustrated in Figure 3b.
To branch from the Secure to the Non-Secure world, there is a BLXNS (branch with link and exchange to Non-Secure state) instruction that shifts to the Non-Secure state, while there is a BX (branch with exchange) to an FNC_RETURN that brings the code back to the Secure world.
On the other hand, branching from the Non-Secure to the Secure world uses a BL (Branch with Link) instruction that leads to a SG (secure gateway) call to an entry function defined by the Secure code. To return to the Non-Secure world, a BXNS (branch with exchange to non-secure state) instruction is executed.
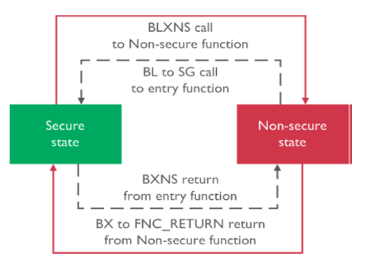
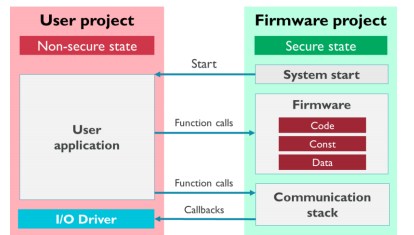
Figure 3a (left) and 3b (right)
The MCUXpresso 55S69:
Figure 4 below illustrates the manner in which an ARM TrustZone project is organized for the board. Two separate projects are created: one for the “Secure” world and one for the “Non-Secure” World. In the projects, bit 28 is set to indicate “Secure” memory, while a “veneer table” is imported as memory to the “Non-Secure” project. Noticeably, the source code (.c file) for the SG functions in the veneer table is not contained in the “Non-Secure” project, while the prototypes for those functions (contained in the veneer_table.h file) are, so that the “Non-Secure” code can access the “Secure” code.
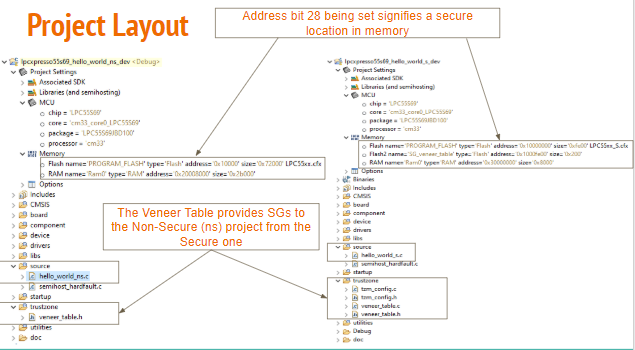
Figure 4: MCU Xpresso Project Layout
In Figure 5, there is a pointer set up for the Secure code to transfer control to the Non-Secure code using a ResetHandler_ns function. Figure 6, on the other hand, shows a piece of Non-Secure code switching to the Secure world via calls to functions defined in the veneer table.
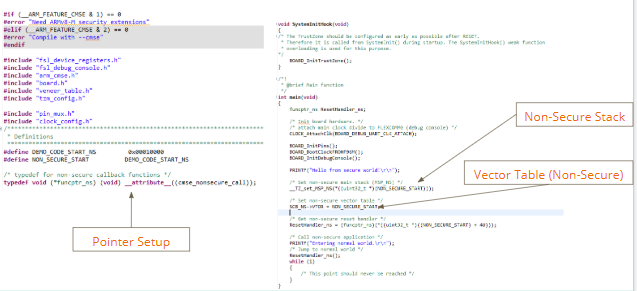
Figure 5: Secure to Non-Secure Code
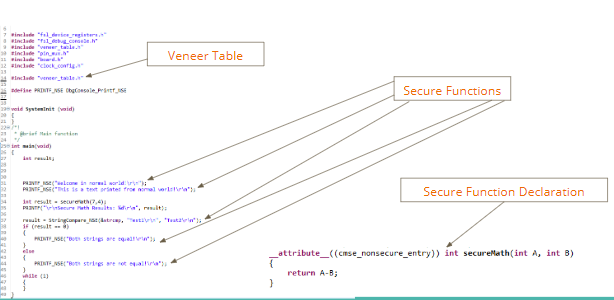
Figure 6: Non-Secure to Secure Code
Vulnerability in Qualcomm’s TrustZone Kernel:
While there have been a few different vulnerabilities found in systems implementing TrustZone, namely in Qualcomm’s implementation. A notable one is outlined in [11], where Android’s full disk encryption was broken. Based on dm-crypt, a Linux kernel-level encryption mechanism, which derives multiple keys to encrypt data and authenticate the user (shown in Figure 7). The KeyMaster trustlet is an application allowed to execute on a dedicated and secure processor.
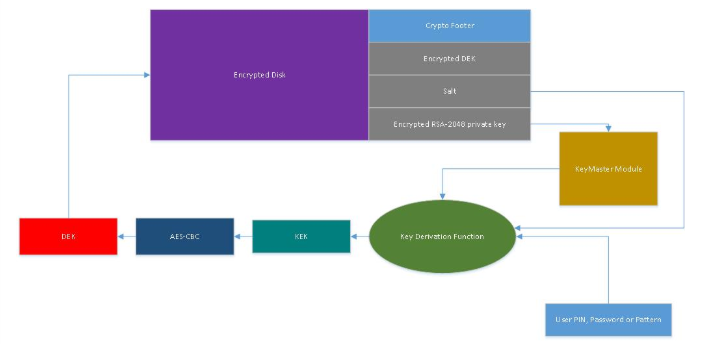
Figure 7: Android Disk Encryption/Decryption
The issue with Qualcomm’s implementation of a Trusted Execution Environment through TrustZone is that the “key needed to decrypt the encrypted RSA-2048 private key is derived from a hardware key that in fact is available to the TrustZone software and is not a real hardware key” [11]. Since it’s not a true hardware key, it can be extracted from software if there is a vulnerability in the TrustZone kernel or its trusted software (namely the KeyMaster trustlet used for encryption).
In this case, two previously published vulnerabilities (CVE-2015-6639 and CVE-2016-2431, for code execution and privilege escalation, respectively) the encryption keys could be directly extracted from the KeyMaster trustlet’s memory. To accomplish this, the following steps were followed [11]:
- Discovered an unprotected region in TrustZone’s kernel code segments
- Overwrote a small-chunk of code (harmless to overwrite) with a TrustZone kernel system-call
- Hijacked a legitimate system call and tricket the KeyMaster module to execute the custom system call, leaking the KeyMaster keys
With the keys, the attacker can then brute force the user’s PIN, password, or pattern (this is a mostly trivial step), and then get the missing piece needed to decrypt the DEK (Device Encryption Key) and then decrypt the file system.
Since the vulnerability’s disclosure, Google has patched the vulnerabilities that it is dependent on. However, a newly found exploit or vulnerability in the system would allow this to be exploited again. Essentially, fixing this issue would require redesigning the system to use a hardware key in the key derivation function, one that can’t be compromised by software.
Establishing a Root of Trust & PSA
ARM’s Platform Security Architecture, or PSA, is the framework used by TrustZone to establish a root of trust. To understand this process, we’ll first take a look at the PSA, and then how TrustZone devices establish a root of trust.
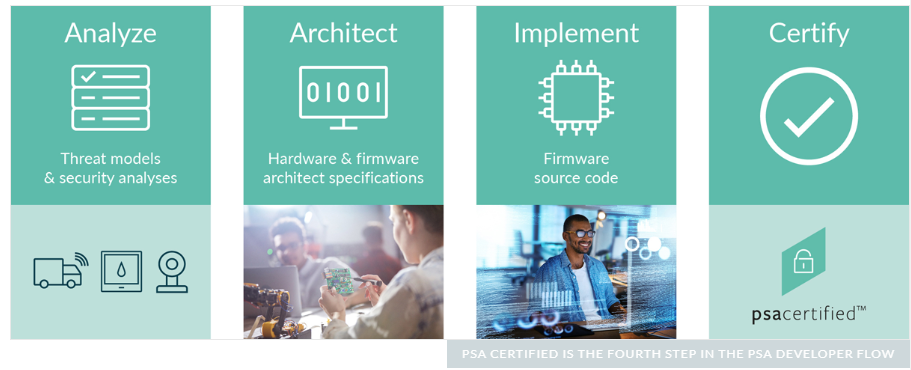
ARM’s PSA consists of four stages: analyze, architect, implement, and certify, outlined below as per [5].
- Analyze: Evaluate assets and assess threats to define specific security requirements.
- Architect: Build a design based on the identified requirements.
- Implement: Create an open-source firmware implementation that complies with the specifications from the previous stage.
- Certify: Assure that the created products abide by security requirements and PSA guidelines, via the PSA Certified scheme.
The PSA Certified scheme was concocted to build trust in IoT devices, through independent security testing [6]. In test lab evaluations, the manufacturers of these IoT devices are able to provide security assurance to their customers. These evaluations are multi-level, for an additional layer of trust in the process. Given that the PSA is ARM’s own invention, it certainly makes sense that TrustZone devices have a Root of Trust established in this manner. PSA Certified has multiple levels, based upon the level of security needed for the given use case.
Resources:

Comments
Post a Comment